Showing posts with label Crafts. Show all posts

Wednesday, November 20, 2013

Hand Print Turkey, an Oldie but a Goodie!

This has to be one of the easiest Thanksgiving crafts out there, the kids love the mess and the bonus is years from now you get to remember how small those cute little hands were at one time.  We took some paint to those paws keeping the palm and thumb brown and letting the kids choose the colors for the rest of the fingers.  They become the feathers. 


Have your little one press their hand on the paper and gently remove.

 
  After it dries draw two legs and feet, a beak and now's the time to explain those red dangly things. 
 
The Snood: the flap of skin that hangs over the turkey's beak. Turns bright red during courtship or when the turkey is upset.
 
The Wattle: the flap of skin under the turkey's chin. Turns bright red during courtship or when the turkey is upset.
 
 The females think the bigger and redder the more attractive those boys become. 
 That may be a lesson for another day, however.


Have fun you turkeys!!!

Wednesday, October 30, 2013

Fall Leaf Impression

This is a simple and fun craft for kids at any age.  Go outside and collect your favorite fallen leaves.  Set or gently tape them down to the table.  Set a sheet of paper over the leaves and at an angle draw back and forth over them.  You can always make it educational by talking about the different parts of the leaves you can see through the impressions like the veins and leafstalk.  See more interesting leaf info HERE.  Happy Fall Ya'll!


Monday, October 21, 2013

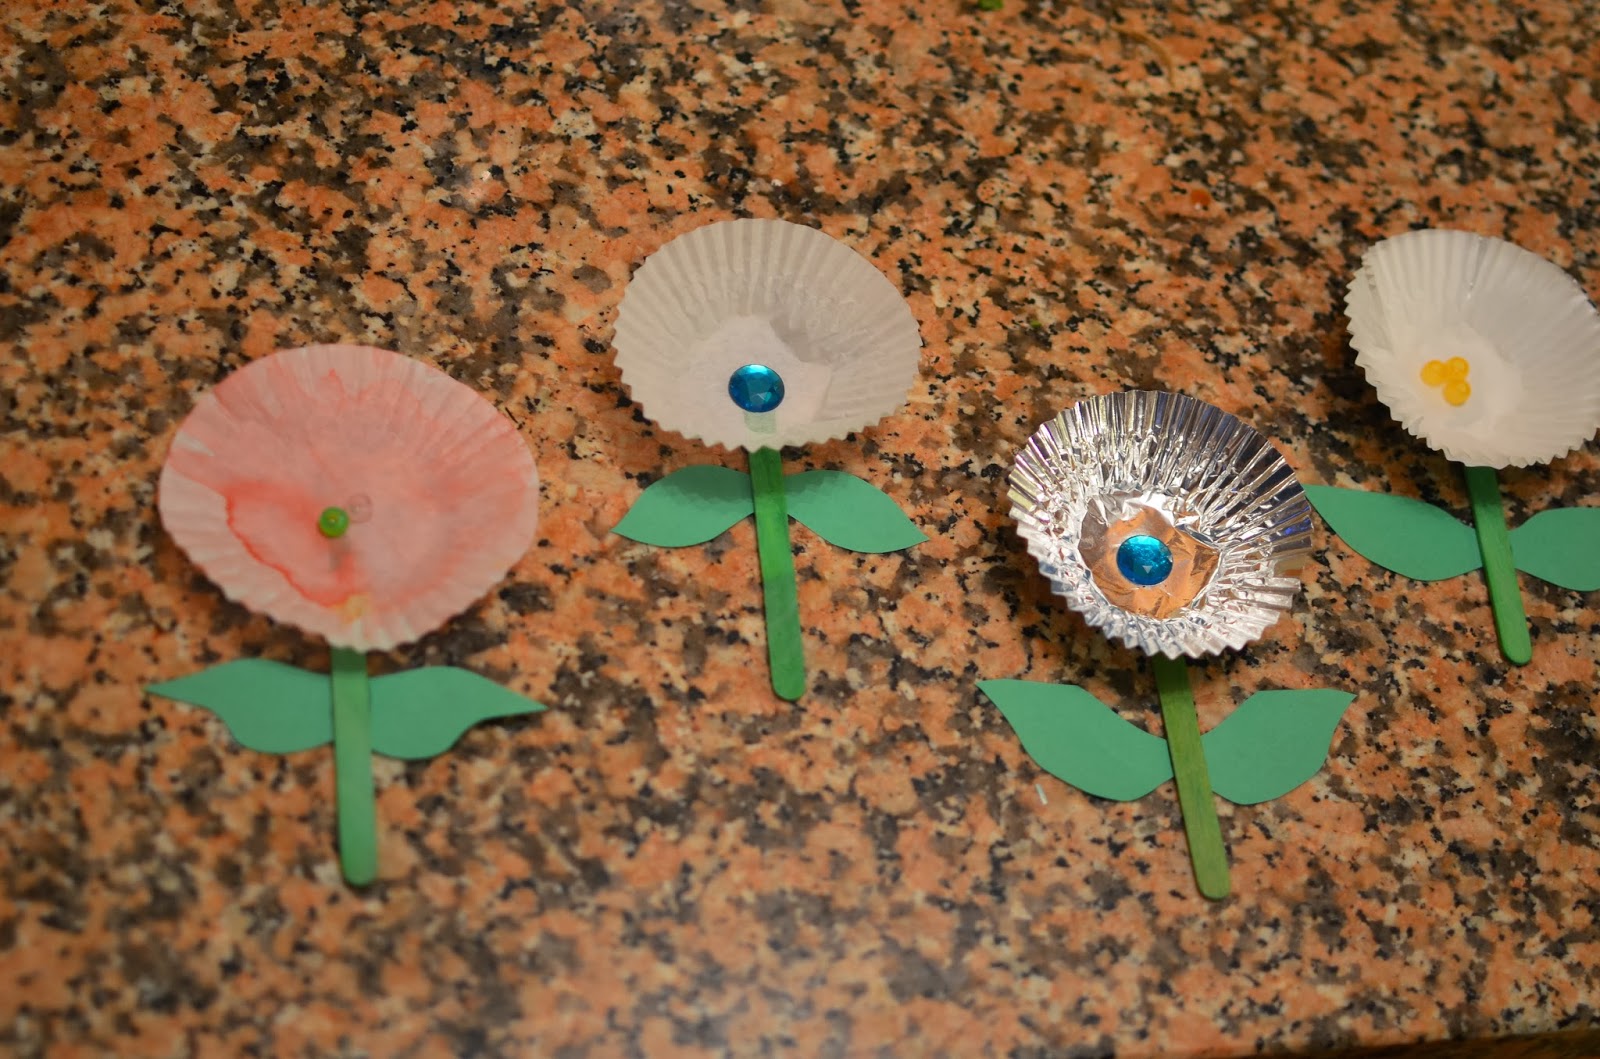
Cupcake Wrapper Flowers

Missing Summer Yet?  We are!  Make these cute flowers to bring the warmth back into your home with your little ones. 
You probably already have the items necessary to make these cute spring flowers at your home.    Kids love how simple and adorable they are. 

 Items needed:

Popsicle sticks

Buttons or beads

Cupcake wrappers

Markers or paint

Glue

Green construction paper

 
Steps:
Paint your popsicle sticks green or use a marker to color them and let dry. 
 Paint your cupcake wrappers as well if you want.
 
 
Push wrappers inside out and glue to your popsicle stick.
Glue beads or buttons in the center of your cupcake wrapper.
 
Fold your construction paper in half and draw a leaf on the folded edge.  Cut them out, unfold and glue to back of your sticks.
 
 
You can really get creative with these by doubling up the wrappers to create a layered look or by cutting the wrappers to form shaped petals and you can use almost anything for the center of the flower!   Play with them individually or glue them to a piece of construction paper to display!
 

Tuesday, October 15, 2013

Hot Air Balloon Craft


 There is something magical about hot air balloons for both children and adults.  The way they gracefully move up and down and only with the speed of the wind makes everyone, young and old, stop and stare.  With this simple craft you can create your own magical hot air balloon and make it as simple or ornate as you want.  


You will need:
Paper plates
Construction paper
Yarn or string
Hole punch or glue
Markers, crayons or paints
 Steps:
Decorate the paper plate.  We wanted to paint ours so we flipped it over to the non-waxy side and used markers and watercolors.   Feel free to use glitter, stickers or whatever excites your child and decorate both or just one side.  Let it dry.
Cut out your basket from your construction paper.  You can use a square or trapezoid. 
 
Punch out holes in the plate and basket and string together with yarn or use glue if you don’t have a hole punch.
 
Hang it high and let it twist and turn in the wind. 

Wednesday, October 9, 2013

You’re on a roll bird feeder


The birds are on their way out of here but we try to keep them coming back each morning with this easy and inexpensive diy bird feeder.   This is a perfect project for little ones and they love the idea of feeding the birds. 

 You will need:

Empty toilet paper rolls

Peanut butter

Bird seed


Steps:

Use a knife to spread a thin layer of peanut butter on the entire toilet paper roll.

Have your child roll it in the seeds.

Slide it on a branch, and wait!

Wednesday, October 2, 2013

Easy Peazy Homemade Play Dough!


My kids love kneading, rolling and sometimes throwing play dough.  Most of the time when all the fun is done the lid doesn’t get put on the jar correctly and it inevitably dries out.  Never  fear, homemade play dough is here!  It is super simple, non-toxic and I bet you already have all of the ingredients in your cabinets.  It’s a great way to “cook” with your kids and when you are done in the kitchen the fun doesn’t have to stop. 

Ingredients:

2 cup of all-purpose flour

2 cup of boiling water (try the microwave for 3 minutes)

1 cup of salt

2 tablespoons cream of tartar

2 tablespoons vegetable oil

Food coloring (use at the end)


Mix all ingredients together in a bowl adding the water last.  Mom or Dad should handle the hot water! Make sure the water doesn’t cool too much before you add it in, otherwise it will not congeal. 


Use a wooden spoon to mix until it becomes too sticky to turn.  Turn out onto a table and knead to desired consistency.  Separate then add food coloring and knead again. 

 
Tips:

Put your dough in a plastic zip bag and it will be ready for next time!

Use essential oil to add scent.  Try lavender or peppermint!  A drop or two will do.

Why not add a little glitter?

Gel food coloring tends to yield more vibrant colors but any kind will do.  Why not take this time to also make it a learning experience about color combinations.  For example how red and blue make purple.

Amanda Carson

Tuesday, February 14, 2012

Valentine Garland


Happy Valentine's Day! Here is a fun and easy craft to make with your loved ones. This is sure to spread the spirit in the house.
Supplies:
We used twine but ribbon or even fishing wire will work.
Paper, various colors
Heart shaped cookie cutters (if you don't have this, draw one, cut it out and trace it)
Hole punch or exacto knife.

We wanted various shades of pink red and orange so we got a couple sheets of each folded them in half and traced the cookie cutters. We cut them out with scissors and punched them with the hole puncher on either side. If you do not have a hole punch use an exacto knife to cut two parallel 1/2" cuts. Run the twine in through one hole and out the other. Continue until you have the perfect amount of hearts for you. String them on the mantle or a door. Anyway your heart desires.

Happy Valentine's Day. Hope its full of hugs and kisses!

Friday, July 2, 2010

Patriotic Crafts

Here are a couple of cute crafts from babycenter you and the kiddos can do for this holiday weekend!


Ages: 5- 8 years
Time to complete: 60 minutes
Re-create America's first flag, originally made in May 1776 by Betsy Ross

What you need:
Piece of white felt , 4 yards 5/8-inch red and white ribbon , 22 yards of blue grosgrain ribbon , 12-inch dowel , wooden beads , ruler , scissors , fabric glue
Instructions:
Cut seven 16-inch lengths of red ribbon and six 16-inch lengths of white ribbon. Cut out a 5-inch-by-9-inch piece of white felt. Start gluing a red ribbon to the white felt, letting half an inch of ribbon hang over the wide side of the rectangle. Continue alternating white and red ribbon until you have a total of 13 stripes. Fold over the short ends of the ribbons and glue to the back of the felt to create a finished edge. Cut seven strips of blue ribbon 6 inches long. Starting at the upper corner, fold half an inch of ribbon over the edge of the felt and glue to secure. Glue the blue ribbons on top of the red and white ones. At the other end of the blue ribbon, fold under half an inch and glue to create a finished edge. Cut 13 white stars from the remaining felt. Glue the stars onto the blue ribbon in a circle. Fold back the tips of the loose ends of the red and white ribbons twice and glue. Take four 3-inch strips of ribbon and create loops. Glue the loops to the back of the wide side of the felt. Place a dowel through the loops. Glue wooden beads to the ends of the dowel to secure the flag. Tie a ribbon to each end and hang.


Ages: 4- 8 years
Star Mobile
Time to complete: 60 minutes

What you need:
White and blue paper , string , embroidery hoop , red paint , paint brush , scissors glue
Instructions:
Paint an embroidery hoop red. Cut out as many white or blue star shapes as you like. Attach the stars to the string by gluing two matching stars together with the string sandwiched between them. Cut the strings to different lengths.
Wrap each piece of string around the hoop and glue or knot ends. Continue attaching stars until you have the desired number, making sure the mobile is balanced on all sides.
Tie four pieces of string at equal distances around hoop and tie the ends together. Thread a wooden bead on the strings.
Hang near a window.


Ages: 3- 8 years
This festive, patriotic fan will keep you cool on a hot, summer day.

What you need:
Red and white wrapping paper , Popsicle sticks , blue construction paper , scissors and glue.
Instructions:
Cut a sheet of wrapping paper 35" long by 5" high. Accordion-fold the paper, allowing about 1/2" for each fold. Glue ends together so it makes a circle. Flip the fan over. Make a handle by glueing a popsicle stick onto each side of the seam where you glued the circle together. Cut out two stars from the blue construction paper and glue them in the center of the fan on the front and the back.

Monday, December 7, 2009

Don't Forget About Sparky!


Our pets are part of the family and even they get a little something for Christmas. See Gatsby and Leila here enjoying the holidays. Ok maybe they didn't enjoy the costumes ( but I did). I always make homemade dog treats for them and put the extras in the freezer for a nice little surprise in February.


Martha Stewart has some adorable ideas for pet inspired gifts this season. Click Here to link to her site to see more cute pictures and great ideas!

Wednesday, November 18, 2009

Acorn Lamp


This is the cutest lamp made by Martha Stewart and Kristin St. Claire. Watch this video that makes it look "easy".

I feel inspired to do something creative now!!

CLICK HERE to link to Martha Stewarts site!

Thursday, October 22, 2009

Wednesday, August 26, 2009

Half Round


Have an old table? Make it chic again even if its missing a leg or two! Check out Martha Stewart's craft of the day! Click here!! This is a great space saving idea as well for a tight corridor or foyer!

Tuesday, July 28, 2009

OH MARTHA!!!!!


The craft queen has some good ideas for keeping kiddies entertained on the beach so you can relax for, 60 seconds or so. Check it out, I love this tic tac toe towel from Martha Stewart Living!

This towel isn't just for drying off at the beach. It's crisscrossed with grosgrain ribbon for a giant tic-tac-toe board that's sure to produce hours of enjoyment in the sand. There's plenty of room for sitting on each end and no complicated cleanup: Just shake the towel out, and fold it up. What will you do for the Xs and Os? Send the kids to collect two different kinds of shells or rocks (five of each).

Start with a solid-color towel, and choose ribbon in a hue that will stand out. We used a 35-by-66-inch bath sheet and 1/2-inch grosgrain ribbon cut into four 24-inch strips. Center tic-tac-toe pattern on towel; each of our squares is 8 inches. You can use a transparent ruler to ensure ribbons are straight and boxes are square. Pin ribbons in place, turn them under at the ends, then sew down centers using thread in the same color as the ribbon.

Here is a link to her page with 59 other good beach ideas!